Ultrasonic Sensor - HC-SR04
Well, you seem curious. Let me feed your curiosity so you won't regret coming more.
Ultrasonic sensor
Ultrasonic sensor is a device that locates the presence of bodies, obstacles or basically anything reflective surfaces that is in front of it. It basically works at frequencies between 25,000 to 50,000 Hz. There are many types of sensors available in the market. Some are:
- Ultrasonic diffuse proximity sensors.
- Ultrasonic retro-reflective sensors.
- Ultrasonic-through beam sensors.
Note that there is a common word in all of them "Ultrasonic". What this means is all of these devices work using the physics of Ultrasonic sound.
Wait, you don't know what Ultrasonic Sound is? Let me explain little bit.
Ultrasonic Sound
Vibration is a must for any sound waves to form. When you speak or talk to somebody you produce sound by the vibration of your vocal cord. Your vocal cord vibrates to produce a sound of frequency that a human ear can hear. Your ears have a certain hearing range. Your ear can only detect sounds of frequency from 20Hz to 20,000Hz or we call this interval "Audible Range". Hz or Hertz simply means cycles per second. Let me not go through the physics of sound production. It's a vast topic to explore. If you want to make an article on it just send me an e-mail or comment down below.
So, what your sensor does is that it has a vibrating component that vibrates over 20,000Hz and a receiving component that detects any frequency of sound that its emitter component creates. Using the following data, we can determine the distance of the cause of that reflection.
- Time it takes for the sound to reflect back and be detected by the receiver and
- The velocity of sound.
Note that we here will talk about the HC-SR04 Ultrasonic sensor which belongs to the Ultrasonic Retro-Reflective Sensors' category. It's one of the cheapest and reliable sensor you can find in the market to use for your projects.
How does Ultrasonic Sensors measure distance?
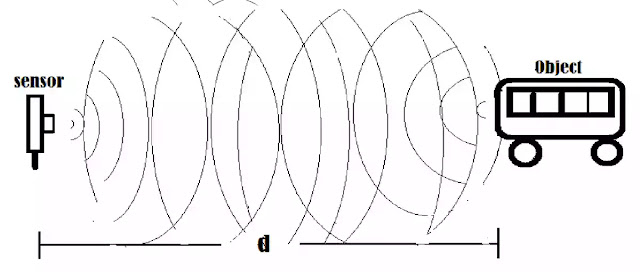
Study the diagram carefully.
Let the time taken by the sound to return back to the receiver be 't' and the velocity of the sound that that instant be 'v'. Note that the total distance traveled by the sound in striking and coming back is two times the distance between the object and the sensor. So, the total distance traveled by the sound in time interval of 't' is '2d'.
Given:
velocity of sound = v
distance travelled by the pulse = 2d
time taken for the pulse to be detected = t
We have the formula,
Velocity = Distance / Time Taken
or, v = 2d/t
or, d = (v*t)/2
Here, velocity of sound is a known quantity and is different for different places. Since the difference is not too vast in different geographical places of Earth, it's normally taken as 343 m/s (It's the speed at sea level in dry air at 20 degrees Celsius).
Time is calculated by the use of Arduino, sensor and some coding and voila the distance can now be calculated using the formula.
So, theoretically, ultrasonic sensor distance calculation is done.
How to use Arduino with Ultrasonic Sensor? Ultrasonic sensor for Arduino
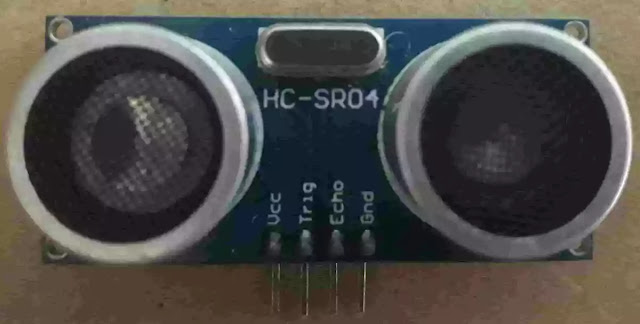
This is a typical HC-SR04 Ultrasonic Sensor. It has four pins named:
VCC - goes to +5v pin of Arduino
TRIG - goes to digital pin 3,5,6,10,11 any one of these(Let's take 11 for now)
ECHO - goes to any digital pin (Take 12 for now)
GND - goes to GND pin of Arduino
Grammar of the sensor pins:
- VCC and the GND pin in here are the power source for this sensor.
- TRIG is one of the circular structure of the sensor that emits Ultra sound.
- ECHO is the another circular structure or the receiver.
Here is the flowchart for the process:
Arduino code for measuring distance using HC-SR04 Ultrasonic Sensor
const int trigPin = 11;    // defines a variable name to pin 11
const int echoPin = 12; //  defines a variable name to pin 12
long duration, cm;        // variable initialization for data storage
void setup() {
Serial.begin (9600); //begins serial monitor at 9600Hz
pinMode(trigPin, OUTPUT); //defines pin 11 as output pin
pinMode(echoPin, INPUT); //defines pin 12 as input pin
}void loop(){ digitalWrite(trigPin, LOW); //makes sensor idle delayMicroseconds(2); //waits digitalWrite(trigPin, HIGH); //sends pulses delayMicroseconds(10); //waits for 10 microseconds digitalWrite(trigPin, LOW); //stops the pulse duration = pulseIn(echoPin, HIGH); //detects reflection time delay(10); // Calculates distance cm = duration * 0.0340 / 2; // Divide by 29.1 or multiply by 0.0343 digitalWrite(trigPin, LOW); //makes sensor idle Serial.print(cm); //prints the distance Serial.print("cm"); //prints cm at the end Serial.println(); //creates newline }
Upload the code to Arduino, wire up the sensor and open Serial Monitor to see the sensor in action.
Check out my Autonomous obstacle avoiding car project using Arduino and Ultrasonic sensor. If you want a video or written tutorial for this, feel free to comment or e-mail me through the contact form. I'll be more than happy to help you out.
Happy Roboting!


0 Comments