Dual boot Kali Linux and Windows
There are several ways to use Kali Linux. You can use it in
small devices like Raspberry Pi, use it in virtual environment inside other
operating systems and even in physical machine alongside other operating
systems. Every use has its own advantages and disadvantages. If you want to hear
about those, refer this ARTICLE. It also explains how you can install Kali Linux in virtual box or virtual environment. So, surely check it out.
Dual booting Kali Linux with windows sounds fancy and it
really is. Some devices might not be that powerful to use Kali in virtual environment(like
mine). Your device often lags and hangs frequently if you used virtual
environment for another operating system. It because of the limitations that
your computer has like low RAM, low processing speed of your CPU, low Hard disk
space and so on.
So, another alternative to use Kali without losing any power
of your machine to use is to boot it in a physical device. You can use it
solely or can use multiple operating systems in same device. Using multiple OSes
in same device is possible through dual boot and you are going to learn about
it in here now.
To dual boot Kali Linux alongside windows in the same
machine you just need to follow these 3 steps:
- Create bootable disk
- Create raw volume or space in your hard-drive for Kali
- Boot with that disk
Let me explain now in detail how it’s done.
1.Creating bootable disks
Why create bootable disks?
To install any operating system, you need its files and let
the computer recognize them as the files of an operating system. Creating bootable disks means making disks that contain all the files that are needed to
install an OS into a system and letting the waking system know that it can use
that disk to start installing those files through it.
You can either use CD-RAW/DVD-RAW drives to put Kali's system files and make bootable drives or use other storage devices like flash drive, pen drives etc. Pen drives and flash drives are easily available, portable and can be used multiple
times but CDs/DVDs has less storage capacity, vulnerable to small stresses,
less portable, and most importantly, are not re-writable. It means you cannot
use normal CDs/DVDs to write data multiple times. It’s for one time use only. There
are CDs/DVDs which can be used multiple times but they are more expensive and
vulnerable to small stress, less portable and can be easily corrupted. So, USB drives are popular nowadays as storage
devices. Why spend money in things that is destroyed easily and has less
capacity? But don’t worry I’ll teach you how to create boot-able disks in both
devices.
How to create a bootable CD/DVD or pen drive?
1. Creating bootable CDs/DVDs
Follow these simple steps:
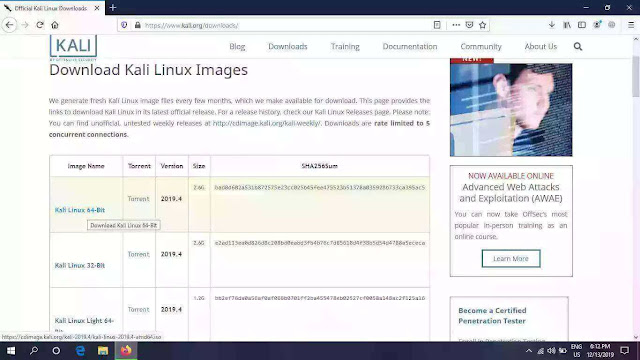
- Download an ISO file of the version of Kali Linux you want
to use from this official website of Kali Linux. Click Here . You can either use torrent to download or simply through your browser's download manager. Select suitable option.
- Now get a blank CD or DVD that can be written and insert it to your computer.
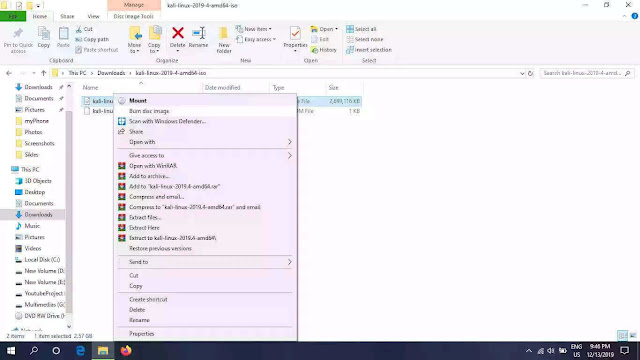
- Now burn the ISO file to that CD or DVD.
-Wait until your computer finishes.
There you go. You created a bootable Kali Linux CD/DVD drive.
2. Creating boot-able flash drive/pen drives:
To create boot-able Kali Linux pen drive follow this article.
2.Create raw space in your hard disk to install Kali Linux
To install Kali Linux you need space in your hard drive.
Instead of creating and formatting the partition in your hard drive later
during the installation process it’s efficient and easy to reserve the space now
through current OS. Decide how much space you need for your Kali Linux OS. I
recommend you to use 40 GB which is more than enough for almost all tasks you’ll
do in that operating system. If you are using Windows (probably you are), follow
these steps to create the space.
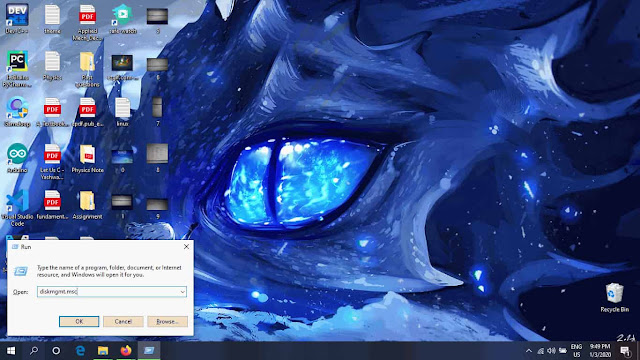
- Press Windows
button+R at the same time and you’ll see a dialog box appear.
- Now type diskmgmt.msc and hit enter.
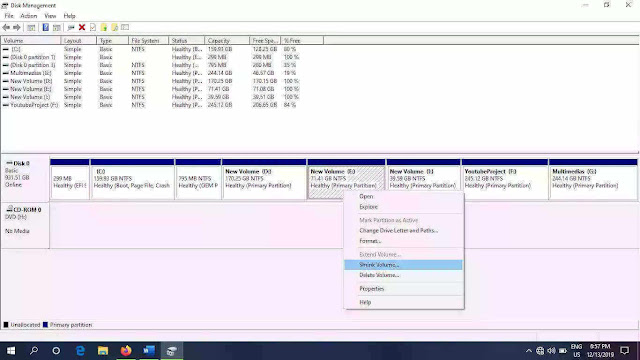
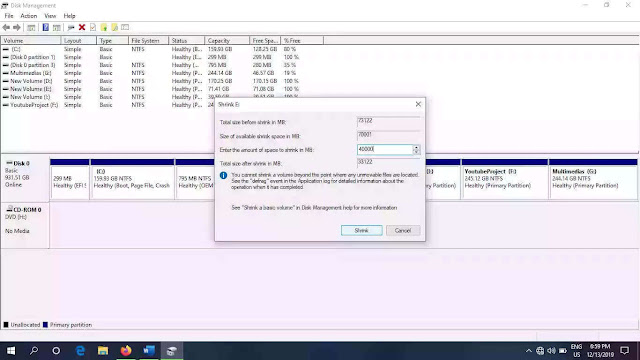
- Now In the boxes with blue top, choose a partition that has
at least 40 GB of free space. Right click the partition and click Shrink Volume.
- Now, put 40000
value or any amount of space you want to give your Kali machine in the highlighted
box or in the box titled “Enter the amount of space to shrink in MB”. Just
remember to put that value in MB. FYI, 1GB = 1040 MB. Do the calculation for
your space now.
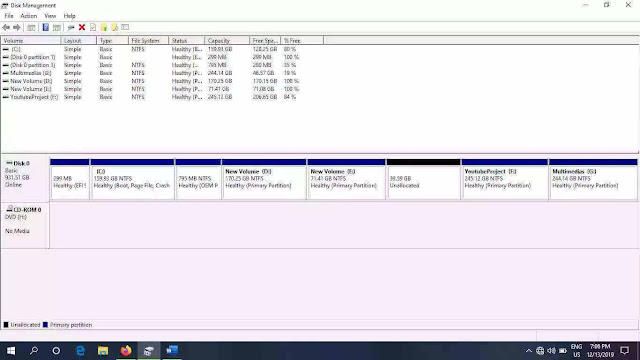
- You’ll see a new box with blue top appear that has the space
of 40 GB or maybe a little less. Now right click that partition you just
created and click Delete
Volume. Click Yes in the confirmation message box and then you’ll
have a black top empty partition with the label “Unallocated”.
- Now its time to boot through your bootable drive. Remember to put the drive into your computer before you restart your computer.
3.Booting new OS and installing Kali Linux
- Put the boot-able disk into the computer and choose the disk you want to boot through in boot menu. It’s possible that you don’t receive the opportunity to choose the disk simply because you didn’t get the boot menu. Your PC may boot through the disk you inserted by default and you’ll see blue screen with “Kali Linux” written. If this is the case then you are okay to proceed but if it’s not, then you need to find the key combination for your device to press and to enter into the boot menu. Every manufacturing company has their own key combinations like Fn+F11, Fn+F2 and so on. Just google “Key combination for boot menu in (Your device name and model) ” and there you’ll find the combination. If you are still stuck, call the shop from where you purchased your computer and ask for the combination.You need to press that key combination immediately after you power on your computer to get into the boot menu. It will not work if you press later, your system will boot through the default disk drive.
- If you have entered into boot menu, choose the disk that you inserted into your computer to boot. It may be either DVD, CD or pen-drive.
- Now you’ll see a blue screen with “Kali Linux” logo. Select
Graphical Install.
- After some booting process you’ll be prompted for language selection. Select your preferred language and click "Continue".
- Select your location and click "Continue".
- Now select the keyboard configuration: American English or any other type as you require.
- After some Hardware detection and loading of additional installation components you’ll be prompted for network configuration. Select WAN if you have WiFi or Ethernet if you have Ethernet connection.
- If you have none, click continue without typing anything. After you see network configure failed message click continue and choose "Do not configure the network at this time” option.
- Now type your host-name. It is the username of your machine. After host-name, create a password and click continue.
- This is the most important and risky part for beginners. If
you did slight mistake then there is high chance that you’ll destroy all your
data. So, it’s better to backup your data before doing anything from here.
- In the partitioning menu, click in MANUAL option.
- You can see the FREE SPACE partition in here. We’ll install
our Kali Linux in this partition. Select it and click Continue.
- Now we have to create a two new partition with that free
space. One partition is for swap and another for the system. Select “Create new
partition” and click “Continue”.
- In the given space, I recommend you to allocate 4GB of space
for swap partition. So, type 36 GB in the field and click continue.
- Select partition type as PRIMARY.
- For location for the new partition select Beginning and hit continue
- Now, in this dialog you can see at bottom the “Bootable flag”
is OFF. Select that option and hit enter to change the value to ON. Then select
Done setting of the partition.
- Here you can see we created the space for our system and
there is still some space titled FREE SPACE. We will now use that space to
create our swap partition.
- Select the Free space and hit continue. Again continue and then again continue to use all space.
- In ‘USE AS' option, instead of “Ext4 journaling file system”
select “swap area” and hit continue.Without turning the bootable flag on
select “Done setting up the partition” and hit continue.
- Now we have completed all the steps. So, select “Finish
Partitioning and write changes to disk” at the bottom of the dialog and hit
continue.
- Select “Yes” to confirm you want to begin creating the
partition and installing the system and hit continue.
- It will take some time to install the system so wait.
- After the installation is complete, choose ‘no’ for network mirror.
- Now GRUB boot loader will be installed into your system. It will help boot both Kali Linux and Windows side by side as you require.Click ‘yes’ to install the grub boot loader(GBR) to master boot record(MBR)
- Now choose your hard disk to begin installing the boot loader into.
- Hurray, you’re now all set. Click continue to finish the
installation. Remove your bootable removable media. Now your system will Reboot and you'll see something like this.
Congratulations! You have successfully installed two OSes in your single computer machine. Now hit Enter to boot into Kali Linux.




2 Comments
Very nice article, but am I supposed to write 36 gb or 4 gb in the field when creating the partition or swap area??
ReplyDeleteYou first select the type of partition to make and then select the respective partition size. For example, if you want to make a swap area of 4GB, select "Swap Area" and then type in the 4GB for its spacing. Sorry for that image to create confusion, it was supposed to be on the later steps.
Delete